A header is a specially designed header that appears as a graphic banner. It uses code to automatically display your logo, description, images, and colours, creating a unique look for your proposal.
Headers used for: #
- Custom Header
- Area Groups Loop
- Areas Loop
- Systems Loop
- Subsystems Loop

Custom Header #
1. Select a Quote
- Choose the quote you want to work on.
2. Go to “View Proposal”
- Click on “View Proposal” to start editing.
3. Click on “Edit”
- Select the “Edit” button to enter edit mode.
4. Add Section
- On the left-hand side of the screen, click on “Add Section.”
5. Choose “Heading”
- From the list, choose “Heading” to add it to your proposal.
6. Move Section
- This section will automatically be added to the bottom of your proposal.
- Click on the section to highlight it, then hold and drag it to your preferred location.
7. Fill Out Details
- Fill out the necessary details for your custom header.
8. Select Header Style
- Choose a header style from the dropdown list.
9. Edit Image
- Click on “Edit Image” to add images to your header.
- Choose from the following methods:
- URL Link
- Browser
- Asset Library
10. Finish Editing
- Click on “Finish Editing” to save your changes.
Area Groups Loop #
1. Select a Quote
- Choose the quote you want to work on.
2. Go to “View Proposal”
- Click on “View Proposal” to start editing.
3. Click on “Edit”
- Select the “Edit” button to enter edit mode.
4. Add Section: “Area Groups Loop”
- From the list, add the “Area Groups Loop” section to your proposal.
5. Move Section
- This section will automatically be added to the bottom of your proposal.
- Click on the section to highlight it, then hold and drag it to your preferred location.
6. Select a Header Style
- Add a header style from the dropdown list.
7. Finish Editing
- Click on “Finish Editing” to save your changes.
Areas Loop #
1. Select a Quote
- Choose the quote you want to work on.
2. Go to “View Proposal”
- Click on “View Proposal” to start editing.
3. Click on “Edit”
- Select the “Edit” button to enter edit mode.
4. Add Section: “Area Loop”
- From the list, add the “Areas Loop” section to your proposal.
5. Move Section
- This section will automatically be added to the bottom of your proposal.
- Click on the section to highlight it, then hold and drag it to your preferred location.
6. Select a Header Style
- Add a header style from the dropdown list.
7. Finish Editing
- Click on “Finish Editing” to save your changes.
Systems Loop #
1. Select a Quote
- Choose the quote you want to work on.
2. Go to “View Proposal”
- Click on “View Proposal” to start editing.
3. Click on “Edit”
- Select the “Edit” button to enter edit mode.
4. Add Section: “Systems Loop”
- From the list, add the “Systems Loop” section to your proposal.
5. Move Section
- This section will automatically be added to the bottom of your proposal.
- Click on the section to highlight it, then hold and drag it to your preferred location.
6. Select a Header Style
- Add a header style from the dropdown list.
7. Finish Editing
- Click on “Finish Editing” to save your changes.
Subsystem Loop #
1. Select a Quote
- Choose the quote you want to work on.
2. Go to “View Proposal”
- Click on “View Proposal” to start editing.
3. Click on “Edit”
- Select the “Edit” button to enter edit mode.
4. Add Section: “Subsystem Loop”
- From the list, add the “Subsystems Loop” section to your proposal.
5. Move Section
- This section will automatically be added to the bottom of your proposal.
- Click on the section to highlight it, then hold and drag it to your preferred location.
6. Select a Header Style
- Add a header style from the dropdown list.
7. Finish Editing
- Click on “Finish Editing” to save your changes.
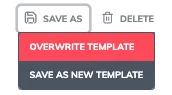
Once you’re satisfied, save your changes to overwrite the template. These updates will automatically apply every time you use the template for future quotes.