There are two ways to add a document to your proposal:
- As a separate ‘Document Section’ to show an overview of all documents.
- Displaying ‘Documents’ in the Item List description
How to add a document to a product. #
1. Select a Quote #
- Begin by selecting the quote.
2. Go to the Quote Editor #
- Navigate to the Quote Editor to access the details of your quote.
3. Choose a Product #
- Select the product to which you want to attach a document.
4. Edit the Product #
- Click on the Edit Pencil Icon next to the selected product to open the editor.
5. Edit Master Product #
- In the editor, choose the option labeled ‘Edit Master Product’ to modify the main product details.
6. Access Additional Options #
- Locate the ‘Additional Options’ column within the product editor.
7. Add a Document #
- In the ‘Document’ description field, enter:
- The name of the document.
- The URL link to the document.
8. Save the Edits #
- Click ‘Save’ to apply and finalise the changes.
Displaying Documents Within the Item List Description #
1. Navigate to the Item List:
- Open your proposal and locate the ‘Item List’ section.
2. Access the Description Column:
- Under the ‘Description’ column, click the ‘+’ icon to add content.
3. Choose Document Type:
- Select either ‘Document Short’ or ‘Document Long’, depending on your preference for how the document should be displayed.
4. Save Your Updates:
- After making the changes, click ‘Finish Editing’ to apply and save them to your proposal.
For an Overview of Documents: #
1. Go to the Proposal View:
- Navigate to the ‘Proposal View’ in your system
2. Select ‘Edit’:
- Click on the ‘Edit’ button to modify your proposal.
3. Add a New Section:
- Click on ‘Section’ and select ‘Product Documents’ from the list.
4. Save Changes:
- Click ‘Finish Editing’ to save the updates and finalise the section.

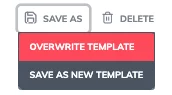
Once you’re satisfied with the location and selected features, save your changes to overwrite the template. These updates will automatically apply every time you use the template for future quotes.